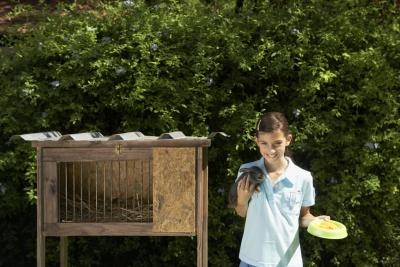
How to Build a Rabbit Hutch That Is Easy to Clean. Building your own rabbit hutch means you can make it exactly to your specifications. Using materials like coated wire mesh and formica laminate for your construction makes cleaning easier, which helps keep your bunnies healthy. You can build your own rabbit hutch with basic carpentry tools, building supplies and a carefully drawn blueprint.
Make decisions about how you want your rabbit hutch to look and where you will keep it. Determine its overall size based on the type of rabbits you have and how many you will keep. Choose materials that are practical for your setting. For instance, if the hutch will be outside, it must be weatherproof and rustproof.
Draw your hutch blueprints to scale, using a ratio of 1 inch equals 1 foot, for example. Draw the blueprints from different angles, including the top view and side views. Label what materials you will use for each piece and how big each of them will be. Use existing hutch blueprints as a reference.
Design your hutch to make it easy-access for cleaning and accessing your rabbits. Put the roof on hinges so it can be swung open. Make two of the side walls removable. Include a fully-enclosed sleeping area in your plans (also with a hinged roof) that attaches to the main living area, so your rabbits have a hiding place that makes them feel safe. Make sure you include passageways between the main hutch and the sleeping quarters in your design.
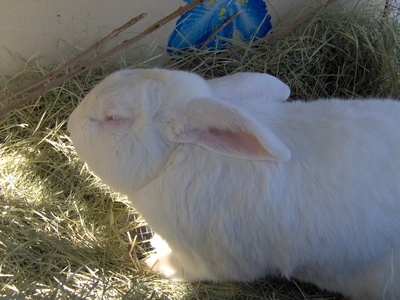
Choose a floor plan with a comfortable surface for the rabbits' feet that includes vents to sweep out waste. Formica laminated wood is easy on their feet and easy to wipe clean. Include slats or holes in the floor in your design so that waste can be pushed through for cleaning. These holes can be lined with mesh. Formica is also a good choice for solid walls in the sleeping area.
Include a shelf in your plans on which you can put a litter pan to catch waste that falls through the mesh in the floor. Buckets under the holes in the floor can also catch waste and will be safe from other pets or children if they are attached flush with the hutch frame.
Take your completed blueprints to a building supply store to find all the necessary supplies. Ask a sales representative for help if you're not sure about an aspect of your plans. Make sure you have all the tools and supplies you need before you begin building.
Cut all the pieces of wood according to your blueprints, using a power saw. Cut the Formica with a router fitted with a Formica bit. Cut the wire mesh with industrial strength scissors. Label pieces with a pencil as you go along to keep them sorted.
Glue the Formica you cut for the floors and sleeping quarters walls to the corresponding wood pieces with wood glue. Clamp it in place with vice grips until the glue is fully dried.
Assemble the horizontal frames for the rabbit hutch. Start with the frames for the top and bottom of the main hutch, then move to the sleeping quarters. Check your pieces and lay them together to test that they fit before moving to the next phase of assembly. Connect all the frame pieces with bolts, washers and wood screws, using a power drill and bolt wrench.
Attach the mesh for the floor holes to the bottom of the floors with staples and an electric staple gun. Attach the floors to the pre-built main area and sleeping quarters frames. Attach the plastic feet to the bottoms of the hutch legs.
Attach the floors and horizontal frames to the vertical beams and legs. Assemble the walls of the sleeping quarters. Attach the roofs to the top frames last. Install hinges, handles and latches as needed to the roofs.
Assemble the removable side walls. Half the window latch will go on the top horizontal beam of the hutch frame, and half the latch will go on the top frame of the removable side wall. Mark the hutch frame with a pencil where the latches will go so that the latches will align properly when they're set into place. Staple the mesh on the outer side of the wall panels and install the latches. The side walls should sit snugly within the hutch frame but should come out easily.
Staple the mesh onto the hutch frame for the nonremovable side walls. Make sure the edges of the mesh are on the outside of the hutch, not in contact with the rabbits.
Install the litter pans under the sleeping quarters and main floor mesh holes. Line the pans with trash bags to make them easier to clean.
Check out the hutch now that it is completely assembled. Look for any rough spots in the wood that should be sanded and/or puttied. Check for any sharp, protruding metal, and sand or cover as needed. Test that all your latches and hinges work properly and are secure. Make adjustments as needed. Your hutch should now be ready for its furry inhabitants!


 Caring For Rabbits: Top 10 Tips To Help
If you
Caring For Rabbits: Top 10 Tips To Help
If you
 How to Control the Odor of Stinky Pet Rabbits
How to Control the Odor of Stinky Pet Rabbits
How to Control the Odor of Stinky Pet Rabbits
 Directions on How to Build a Cage for an Outside Rabbit
Directions on How to Build a Cage for an Outsi
Directions on How to Build a Cage for an Outside Rabbit
Directions on How to Build a Cage for an Outsi
 How to Calm a Thumping Rabbit
How to C
How to Calm a Thumping Rabbit
How to Calm a Thumping Rabbit
How to C
 How to Raise Commercial Meat Rabbits
H
How to Raise Commercial Meat Rabbits
How to Raise Commercial Meat Rabbits
H
Copyright © 2005-2016 Pet Information All Rights Reserved
Contact us: www162date@outlook.com